

How We Installed A Thin Brick Backsplash & Butcher Block Countertops
Hi ya’ll! For those that don’t know me, I’m Bekah - Certified Home Stager, Master Color Consultant and owner of Lemons & Lace LLC where I specialize in staging the homes that people are LIVING in while they are on the market. For those that DO know me, y’all know that my family and I moved into our little farmhouse fixer upper about 6 years ago now and we have tackled alllllmost all of the renovations ourselves. I say almost because neither me nor my husband were trying to paint the exterior of a two story house - I can’t want to do it 💀 I’m also picturing our children trying to climb the ladder so they can come tell us they would like their 12th snack of the day but thats neither here nor there. No thanks.
ANYWHO we’ve done quite a bit to our kitchen over the years - faux concrete countertops, tile backsplash, new sink & faucet, and I have painted the cabinets over 5 times 😂 A lot of what we did initially was never intended to be a long term solution - we just wanted to update the look of the kitchen for an affordable price since we had just spent a small fortune on the downpayment for the house. Below is what we were working with initially - your typical 90s orange oak and wallpaper vibe. So. Much. Wallpaper.
***The links within this post are affiliate links - which means I may make a small commission of you make a purchase through one of these links. This is at NO additional cost to you! The commissions just help support the family behind this small business of mine ☺️ ***
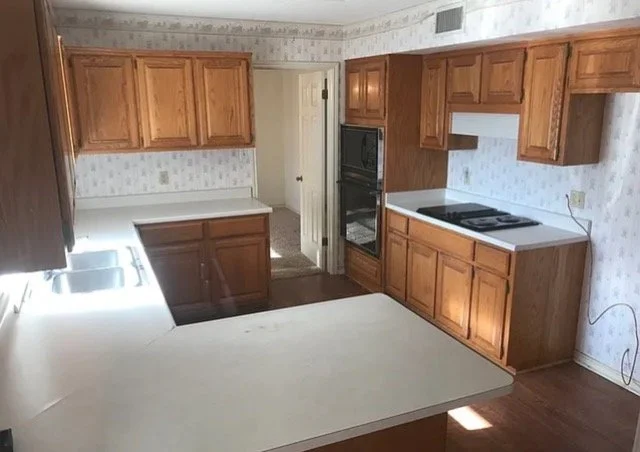
Here is our kitchen when we first moved in in 2017.

Above is a picture of the kitchen after we added the concrete overlay countertops, shiplap, tile, and painted cabinets. This was before the butcher block and brick backsplash!
One night we decided it was time to do a more long-term upgrade to our cooktop wall.
I have always felt strongly about embracing the fact that our home is not brand new - I’m not going for a modern look in this home, it wouldn’t make much sense if I did. So the idea of doing a brick backsplash that would play off of our brick fireplace and also adding a butcher block countertop to our cooktop space just made sense! & one of the nice things about butcher block countertops is that they don’t feel “off” when they are paired up with another type of countertop. which in our case was the concrete overlay countertops that were on the wall cabinets across from the cooktop.
I would like to mention here that I know a lot of people shy away from butcher block countertops because of the maintenance that can be involved with them. But in our case, we had already spent 5 years with our concrete overlay countertop which required sealing & also an additional layer added after 3 of those years… so maintenance is nothing new to us and honestly it can’t be worse than that 😂
Demo Time
The countertop and cooktop were all mounted by screws so the removal of both was easy peasy. However busting out the tile here was … interesting, ha! My poor husband. The majority of the tile did come out with a chisel and a hammer which was fairly easy once you got it going. The issues came when the tile decided to take a piece of sheetrock with it 😑 So my advice: have some extra material on hand to fix the sheetrock so it doesn’t cost you an unforeseen store run!

Tools Used:
Chisel & Hammer For Tile Removal
The Butcher Block
We purchased our countertop through Lowes - it was Allen & Roth brand, which I believe is just their store brand. Do not just buy this online and have it shipped to you! You need to physically go to the store and examine each butcher block to select the best one. Check for scratches, cracks and any inconsistent coloring that would effect the stain.
Once we got the butcher block home, my husband measured for the total length of the countertop and also got the cut out details for the cooktop appliance. He measured for this approximately 1000 times just to be sure💀
Make sure you pay attention to which side is facing out!!!
Pay attention to this!!! On our butcher block, one edge was sanded the same as the top of the butcher block was and one edge was not. How much wood is sanded makes a BIG difference in how your stain will look. Of course you could just sand the one edge if worse comes to worse, but it’s much easier just to make sure the edge that is facing outward is the edge that is sanded the same amount as the top.

Butcher Block Stain
Use one of your butcher block scraps from cutting to test the stain you are planning on using. Apply it EXACTLY how you plan to apply it to the butcher block. As a Master Color Consultant, selecting stain colors is my jam and my shop is stacked to the gills with different stain colors! If stain selection makes you break out in hives - book a color consult with me and I will personally help you! You can reach out through my Contact Me page with any questions or head over to my Etsy Shop to book with me.
Step One : Do any additional sanding needed to reach the texture you want.
Our butcher block was sanded very well so we had no desire to put any additional elbow grease into sanding.
Step Two: Apply wood conditioner.
Do NOT sleep on this step! Wood conditioner**** will ensure that your stain looks even across your whole butcher block. If you don’t use wood conditioner, you run the risk of getting a blotchy looking stain job.
Here is a link to the wood conditioner I used.
A note for the wise: Don’t let you husband sweat onto the butcher block or you will have to let it dry and potentially sand it out … ask me how I know 😂

Applying the wood conditioner first to ensure we got an even stain application.
Step Three: Stain.
After following all of the steps on the wood conditioner can, it’s time to stain! We went with MW Special Walnut stain on our butcher block - one of my go to stains! I tested out several other stains for you on our butcher block so you can see the different results. IMPORTANT!: Different wood types, sanding techniques and application styles will ALL have an effect on how a stain color turns out. So use this picture as a guide but ALWAYS test the stain before fully applying it.

This is our butcher block after staining with Minwax Special Walnut - I did 2 coats of this stain.

Step Four: Butcher Block Oil
If you’ve already gone down the butcher block rabbit hole, you’ve probably heard some people say they used polyurethane and some say they used oil. Well, I’m here to say that we used a food grade oil because to me it liked the idea of the protection not just being on top of the butcher block. We went with Watco Butcher Block Oil (Food Safe). Follow the directions closely on this can, it requires quite a bit of drying time between coats! We did a total of 3 coats of butcher block oil.

Now for the thin brick backsplash!
Something that made our brick backsplash install more fun was the fact that you can see both our brick fireplace AND our backsplash at the same time. So I couldn’t just find aaaany brick, I needed to find brick that was a close match to our fireplace 😬 Good times, good times. We ended up finding a brick called Province Series Thin Brick and ordered it in two different colors to achieve the look of the fireplace. Not to mention I white washed our fireplace a few years ago and I would need to do the same to this brick after it was all said and done. Ya gotta do what you gotta do!
Tools Needed:
Thin Brick - We used Providence Series Thin Brick at Lowes in both colors - Carbon & Stillwater
Spacers - My husband ripped plywood for this
Mapei Ultracolor Plus FA Grout (Rapid Setting Grout Replacement) Linking for the picture, order in whatever color you need!
Grout Tool (comes with the grout bags if ordered through the above link!)
Step One: Applying brick to the wall.
Instead of using a thin set, we actually applied a construction adhesive (linked above) to each brick in order to mount them on the wall. & Instead of using traditional tile spacers, my husband ripped some plywood we already had into several strips to do all of the spacing between the bricks. Since the width of the plywood is consistent, this worked out perfect! Just make sure not to remove the spacers too soon and do'n’t over apply your adhesive so that it sticks to the spacers as well - for obvious reasons, you’ll have a hard time pulling the spacer back out!

We used a level and ripped plywood spacers to make sure they were evenly spaced and level.
This was my husbands FAVORITE part (can you feel the sarcasm 😬), we bought two different colors because I needed to work in a few red bricks so the backsplash as a whole would match our fireplace better. Do you know how much thought it takes to make random red bricks LOOK random? Well, I didn’t either but I sure do now! What I did was I laid out each row so I could plan where the red bricks would fall and then I would hand the bricks over one by one to my husband as he needed them. He claims he could have gone 10X faster if I wasn’t hand picking the bricks and I don’t doubt that he’s probably right 🤣

Step Two: Let adhesive dry & whitewash brick.
There is a good chance you aren’t going to be whitewashing your brick but just in case you are - this is how I did it!
1) Grab a white interior paint (in my case it was SW Drift of Mist reduced 50%) and mix together 1 part paint to 2 parts water.
2) Use a paint brush to apply the paint/water mixture to each brick, doing just a couple at a time. This can be messy and will splatter so apply carefully and protect what you need to!
3) Go back to the couple of bricks you just painted and dab them with a cloth, which will remove some of the paint.
4) That’s it!


Here are a couple photos showing the difference after whitewashing the brick. Sometimes the brick color isn’t quite right and this could be the thing that gets you that color you want!


Step Three: Time to grout!
What comes first - the butcher block or the grout?
It took us a bit to decide whether or not we wanted to install the butcher block and then install the grout or the other way around. The problem was that if the grout went too low, then the butcher block wouldn’t fit flush. But on the other hand, grouting is messy and we didn’t want to mess up the butcher block! A real DIY dilemma.
Solution: We put the butcher block on as if we were going to mount it, then drew a line all the way across. This was essentially the line that grout could not go past if we wanted the countertop to fit properly! We removed the butcher block, then put a plywood board, some cardboard and another plywood strip on top of that which hit almost perfectly up to the line. Our plan was to allow the grout to go down vertically but then use the matching Mapei caulk color to go between the butcher block and the brick. This way we didn’t need to worry about the grout breaking when we pulled the board out or the grout dripping down too far. Below is a picture showing what we did!

Next Steps:
Since we whitewashed the brick, we sprayed our first coat of sealer to the brick before we applied grout.
Mix the grout to the consistency of peanut butter. We used Mapei Warm Gray.
Cut the end of the grout bag (cut a big enough hole so you can fill the grout line in one pass)
Fill the grout bag with grout - do not fill them too full or it will be a pain! Twist the bag as you apply the grout to keep it coming consistently.
Do not worry about any grout that drips down onto the tile - this can be fixed later.
Once all of the grout is in, let it dry to the point where it has resistance when you go to push it in with your finger.


At this point, use your grout tool to smooth out the grout lines. You can also knock off any grout that got onto the bricks during this time.
Wait again until the grout is almost completely dry, then use the mortar brush and brush over the grout lines. If the brush is making very obviously brush lines, wait for the grout to dry a little longer.
Let it dry completely and you’re now done with grout!
Here’s a link to grout bags and a grout tool! Also linked in the tools list above.

Ta da! Now in goes the butcher block.
Keep in mind you will need to seal the grout/brick after everything is all dry! Once everything is dried and ready to go - its time to install the cut butcher block.
Since our last countertop was screwed into the cabinets, we installed the butcher block the same way. Once installed, in went the cooktop!
The last step is caulking and boy does it make a difference! Don’t forget that if you used a Mapei product on your grouting, there should be a Mapei brand caulk that matches - which is totally the route to go if you can!
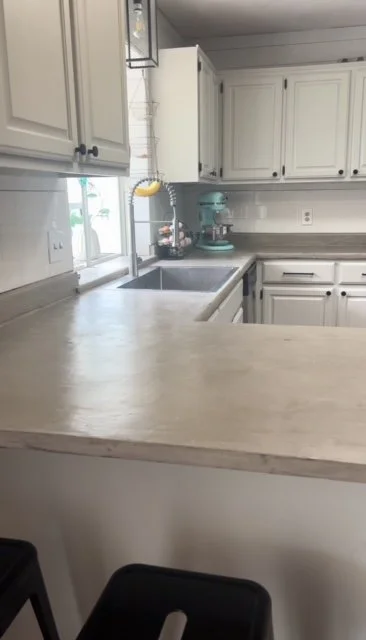
Voila - a brand new brick backsplash and butcher block countertop!

I hope this post empowers you to take on a project like this in your home! It completely transformed the look of our kitchen and I am just absolutely in love. If you did this project, let me know in the comments below!
Have questions? Email me through the contact page or drop a comment below! Happy DIYing!
Tools Recap:
Thin Brick - We used Providence Series Thin Brick at Lowes in both colors - Carbon & Stillwater
Spacers - My husband ripped plywood for this
Mapei Ultracolor Plus FA Grout (Rapid Setting Grout Replacement) Linking for the picture, order in whatever color you need!
Grout Tool (comes with the grout bags if ordered through the above link!)